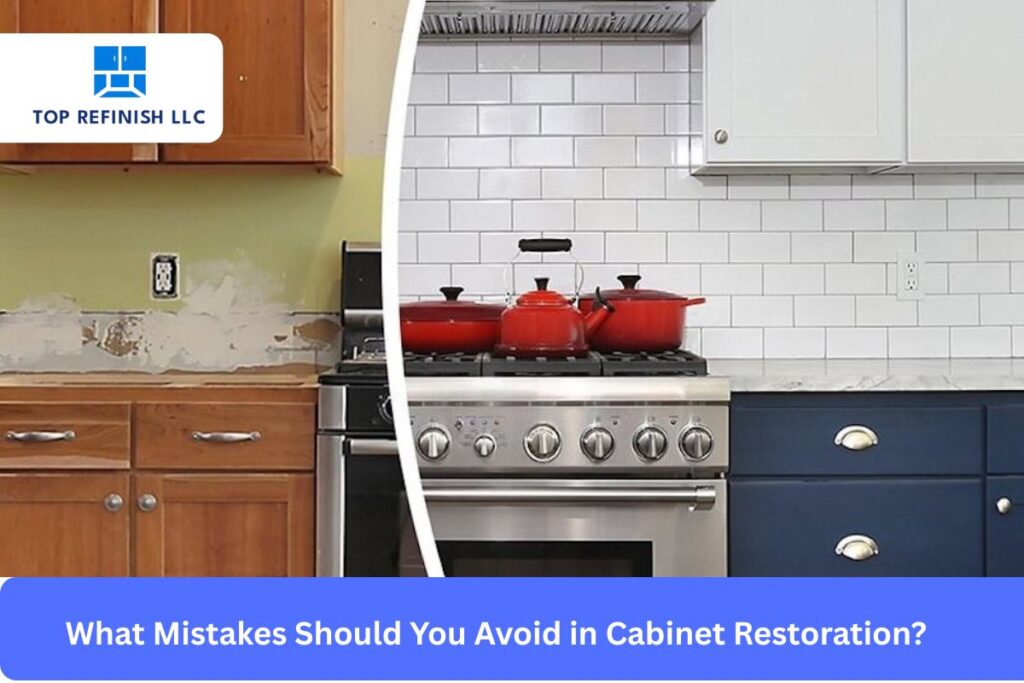
Cabinet restoration is one of the smartest ways to refresh your kitchen or bathroom without the cost of a full remodel. When done right, it can bring worn-out cabinets back to life, improve functionality, and elevate the entire look of your space. However, the process requires careful planning, proper techniques, and attention to detail. Even small mistakes can lead to uneven finishes, peeling paint, or long-term damage.
In this guide, we’ll walk you through the most common cabinet restoration mistakes to avoid. Whether you’re considering a DIY approach or hiring professionals, understanding these pitfalls will help you achieve smooth, durable, and visually appealing results that last for years.
Skipping Proper Cleaning and Surface Preparation
One of the biggest mistakes in cabinet restoration is neglecting proper cleaning before starting the project. Cabinets accumulate grease, dust, and grime over time, especially in kitchens. If these contaminants aren’t removed, paint or stain won’t adhere properly, leading to peeling or uneven coverage.
In addition, surface preparation goes beyond cleaning. Sanding is essential to create a smooth and receptive surface for finishes. Skipping or rushing this step can result in a rough texture and poor durability. Taking the time to clean thoroughly and sand evenly ensures that your restoration starts on a strong foundation and delivers professional-quality results.
Choosing the Wrong Paint or Finish
Not all paints and finishes are suitable for cabinets. Using the wrong type can lead to chipping, bubbling, or fading over time. Cabinets require durable, high-quality coatings that can withstand daily use, moisture, and temperature changes.
Moreover, selecting the right finish—whether matte, satin, or glossy—plays a crucial role in the final appearance. A mismatch between your design goals and the chosen finish can affect the overall aesthetic. Investing in cabinet-specific paints and finishes ensures better adhesion, longevity, and visual appeal.
Ignoring Repairs Before Restoration
Restoration isn’t just about improving appearance—it’s also about fixing underlying issues. Cracks, loose hinges, warped wood, or water damage should be addressed before applying any finish. Ignoring these problems can compromise the entire project.
Additionally, failing to repair structural damage can lead to further deterioration over time. For example, painting over a damaged cabinet won’t stop it from weakening or breaking. By tackling repairs first, you ensure that your cabinets are not only beautiful but also functional and durable.
Rushing the Process
Cabinet restoration requires patience, and rushing through the process often leads to disappointing results. Each step—from cleaning and sanding to priming and painting—needs adequate time to be done correctly. Skipping drying times or applying coats too quickly can cause streaks, bubbles, or uneven finishes.
Furthermore, haste increases the likelihood of mistakes that may require rework. Taking your time allows each layer to set properly and ensures a smoother, more professional outcome. A well-paced approach may take longer, but it ultimately saves time and effort by reducing errors.
Skipping Primer Application
Primer is a crucial step that many people overlook during cabinet restoration. It creates a bonding layer between the cabinet surface and the paint, improving adhesion and durability. Without primer, paint may not stick properly, leading to peeling or chipping.
In addition, primer helps cover stains, discoloration, and previous finishes. It provides a uniform base that enhances the final look of your cabinets. Skipping this step might seem like a shortcut, but it often results in a finish that doesn’t last. Using a high-quality primer ensures a smooth and long-lasting restoration.
Using Poor Quality Tools and Materials
The quality of your tools and materials can significantly impact the outcome of your cabinet restoration project. Cheap brushes or rollers can leave streaks, lint, or uneven textures on the surface. Similarly, low-quality paints may not provide the durability needed for cabinets.
Moreover, investing in better tools often makes the process easier and more efficient. High-quality brushes, sprayers, and sanding equipment help achieve a smoother finish with less effort. While it may cost more upfront, using the right tools and materials leads to superior results and reduces the need for touch-ups.
Overlooking Hardware and Details
Cabinet hardware, such as handles, knobs, and hinges, plays a vital role in the overall look and functionality of your cabinets. Overlooking these details can make even a well-restored cabinet appear incomplete or outdated.
Additionally, failing to remove hardware before painting can lead to messy edges and uneven finishes. Taking the time to update or clean hardware enhances the final result and adds a polished touch. Small details often make a big difference in achieving a cohesive and professional appearance.
Not Testing Colors and Finishes First
Choosing a color or finish without testing it is a common mistake that can lead to regret. Lighting conditions, surrounding décor, and material textures can all affect how a color appears in your space. What looks perfect in a store may not translate the same way in your home.
Therefore, it’s important to test samples on a small area before committing to the entire project. This allows you to see how the color and finish interact with your cabinets and environment. Testing helps you make confident decisions and ensures that the final result meets your expectations.
Attempting Complex Projects Without Experience
While DIY cabinet restoration can be rewarding, some projects are more complex than they appear. Intricate designs, extensive damage, or large-scale restorations often require professional expertise. Attempting these projects without the necessary skills can lead to costly mistakes.
In addition, professionals have the experience, tools, and techniques needed to handle challenging situations. They can deliver consistent and high-quality results that may be difficult to achieve on your own. Knowing when to seek professional help is key to avoiding frustration and ensuring a successful restoration.
Wrap-Up: Avoid Mistakes for Stunning Cabinet Results
Cabinet restoration is a cost-effective way to breathe new life into your space, but avoiding common mistakes is essential for success. From proper cleaning and preparation to choosing the right materials and taking your time, every step plays a crucial role in the final outcome. Ignoring these details can lead to poor results and unnecessary expenses.
By planning carefully, using quality products, and addressing underlying issues, you can achieve a smooth, durable, and visually appealing finish. Whether you choose a DIY approach or hire professionals, being aware of these pitfalls ensures a more efficient and satisfying restoration process. In the end, a well-executed cabinet restoration not only enhances your home’s beauty but also adds lasting value.
FAQs
1. Can I skip sanding during cabinet restoration?
No, sanding is essential for proper paint adhesion and a smooth finish.
2. What type of paint is best for cabinets?
Cabinet-specific paints or high-quality acrylic or enamel paints are ideal for durability.
3. How long does cabinet restoration take?
It depends on the project size, but most restorations take several days to complete properly.
4. Should I replace hardware during restoration?
Updating hardware is recommended to enhance both appearance and functionality.